Tuesday, March 12, 2013

  Welcome back and thanks for the responses. I've been getting asked a lot about "bug out bags" or BOBs, 72 hour bag or go bags whatever you wish to call it.

  Essentially we're talking about a bag that can sustain you for at least 3 days while on the move. Bags come in all different shapes and sizes. Tactical, not tactical, commercial and the Tacticool. Keep in mind you're going to have carry the darned thing around with you for a few days. So keep your choices appropriate.

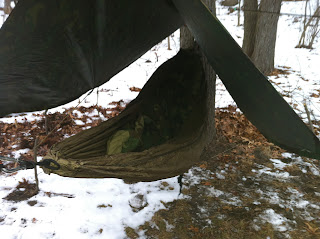
Authors "Winter Bag"
The Bag pictured above is a simple Datsusara Battle Pack BP-04 with MOLLE webbing that allows the attachment of additional pouches. In it, I have a dry bag with a complete base layer and wind pants, a TAD gear soft shell jacket a variety of dry fleece items and a blanket. A SOL emergency bivvy is also in there.


Toiletries include a roll of TP with the cardboard tube cut out and the roll "flattened", a package of baby wipes, toothpaste, toothbrush and Super Body Care® Body spray. The SBC spray is a cleanser, disinfectant and refresher all in one and best of all...it is completely ORGANIC. I will be adding the SBC body wipes as soon as they arrive to replace the baby wipes.
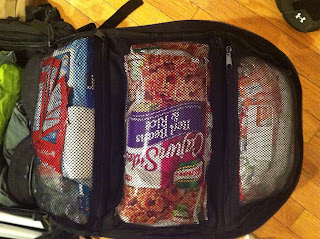

Hygiene-Food Pantry-Condiments

My food pantry begins right above the toiletries. I have various of those "just add water" and boil, rice and noodle dishes that are high calorie and provide me with energy if I'm on foot. A simple matter of boiling water and adding the pouch and letting it simmer down. Cheaper than those expensive "dehydrated meals" and easy on the palate. I also have various jerky meats and fully cooked BACON!  Above the meals is my "snivel" pouch. It contains salt, pepper, hot, mild and soy sauces, sugars, jellies, etc to add a little variety to my foods.


The next compartment contains my sheltering kit. Essentially a 8.5 X 6 foot tarp, some bungees and 550 paracord. Unseen are 6 alloy ground stakes. Additionally The green and silver tarp you see is a "survival blanket". My fire kit and spare sporks and some Gator Chews round it out.


Outside pouch #1 is attached via MOLLE and it contains my "right now" pantry. I can make a quick fire and get some hot wets going righ away without having to open up the main compartment of the bag. It contains: Ramen Noodles, Jerky, Hot Cocoa, Oatmeal, and of course coffee. VIA from Starbuck's to be precise because it's boil and drink and comes conveniently packaged. There are also some limited condiments to add some kick to the noodles.


Nalgene® Water Bottle Carrier and Fire Kit1


Guyot Designs Nalgene® STEEL Bottle
My water bottle carrier serves multiple functions. It contains a cook pot/cup and lid which nest with my steel bottle and it also houses my primary fire kit. Primary as in it's my first choice when I go to make fire. Waterproof matches, lighter, cotton balls, fat-wood, swedish fire steel and striker.

Other items in my bag are an EnO Hammock with straps, spare gloves, flashlight, compass, and GPS. I attach my sleeping bag or a thick 100% Wool blanket to the bottom via MOLLE and I'm all set.


The whole pack weighs in under 45 pounds and it can travel relatively long distances before causing fatigue, which is key when setting up these bags. This one is primarily set up for winter time usage I have another which is my "3 season" bag. Which I'll go over at a later date.

Main Pack:

Super Body Care Products ( Highly Recommended):


Thursday, March 7, 2013


  Well it's it's been a little while since I posted last, and MY, how things have changed. I have spent the majority of this winter training my ECWS (Extreme Cold Weather Survival Skills) under some excellent instructors. The things I've picked up are just an awesome addition to my skill set. My confidence levels making fire with cold hands and no matches or lighter are through the roof. I am also very glad I had this opportunity to try out some equipment and really put it through it's paces. Basically I just ran the hell out of it and actually tried to break it! I've also met up with some interesting people with loads of knowledge to offer along the way. I will try and prioritize the gear but please don't crucify me if I jump out of order. So let's begin in earnest shall we?

    I think most of the experts I've come across, will agree the #1 piece of equipment you should have is your knife. Not just any crazy 2 pronged squiggly bat-shaped knife out of the "cheaper than shit" catalog:
Looks really cool huh?

Looks Really tough huh?

In all seriousness DO NOT bet your life, on either of these types of knives! I had the privilege of running the so called "zombie hunter" this winter. I stick to the rule of "the quality of your tools MUST be the absolute PRIORITY if you intend to survive!"

CLEARLY...not so tough.


Your survival knife must be a relatively high quality carbon or stainless steel. It must be "full tang"
meaning it should be one solid piece of quality steel like the knife in the bottom example.
The Zombie knife was a "rat tail" like the upper example. You can see why it broke.


The very best survival knives out there are all full tang, quality steel and thick enough to withstand major abuse. In fact they are not called "survival knife, or Tactical this or that...they don't have a cool compass or hollowed out handle or any other BS thats going to break with REAL WORLD usage.


They're simply called Bushcraft Knives. Thick, one piece designs with Micarta handles, capable of splitting a log into usable pieces and also doing small detail work like carving. The same knife can make a spark to start a fire using a "ferrocerium rod" as pictured above.

Companies such as Blindhorse, Hedgehog, Norseman, etc, make these excellent knives as well as mass production companies like Esee and Nora. Average prices are about $100 and up for entry level. Good custom knives can run you as much 6 to 700 dollars.

A good quality knife should handle simple tasks like "batoning" wood for a fire.